I've been planning on losing some weight before my Europe trip, and well, I leave in 15 days and haven't exactly been losing weight. So I've decided it's time for the Cabbage Soup Diet (CSD) - love up to 10 pounds in 7 days! Read about it here.
I've done the CSD twice-ish before....once was successful, and once I stopped after 2 days (but I blame Ryan for that....somehow he convinced me that tator tots were an okay substitute for the baked potato. It went downhill from there).
The successful attempt was the first time I went on the CDS. I actually lost 10 pounds in the week I was on it, but it definitely wasn't easy. I will give a brief overview of what the plan looks like (from memory, check the link above for a more accurate schedule).
Day 1- eat the soup and any fruit except for bananas. Drink water and unsweetened tea
Day 2- eat the soup and any vegetables you want, but try to stay away from corn, peas, and beans. Same drinks. Oh, and you can eat a baked potato for dinner, but I didn't do this before, and probably won't this time either.
Day 3- eat the soup and fruits (no bananas) and veggies (avoid peas, corn, beans). Same drinks.
Day 4- eat the soup, bananas and skim milk. THIS IS THE WORST DAY
Day 5- eat the soup, beef (real food!), and tomatoes. Drink lots of water this day
Day 6- eat the soup and beef (as much as you can eat!! They say you can eat 2 or 3 steaks if you want)
Day 7- eat the soup, vegetables, and brown rice. Same drinks as before.
And that's it! It sounds pretty easy...and it's only 7 days. But it is definitely a HARD 7 days, trust me. The soup is okay at first. But you start to get sick of it pretty quickly, and you start to notice that you're not really eating anything that's going to give you energy. I remember being super worn out and grumpy when I did this diet in the past. Oh, and quick confession...on the 6th day I actually ate some bread. I bought a mini loaf thing from safeway, and ate it, and felt MUCH better.
Anyway, Day Zero was all about getting prepared for the next 7 days. First of all, I had to make the soup. Below is the recipe I used, which is actually from Weight Watchers. And I should mention that I don't actually have the recipe in front of me, so this is from memory. If there are any major problems, I'll probably come back and edit it. The CSD site has a recipe, but I didn't think it was as good as this one.
Cabbage Soup (4 - 1 cup servings)
-1 1/2 cups shredded cabbage
-2 garlic cloves
-1/2 cup yellow onion
-1/2 cup carrots
-1/2 cup zucchini
-1 tsp oregano (dried)
-1 tsp basil (dried)
-1/4 tsp salt
-3 cups broth (beef, chicken, or vegetable)
-1 tsp tomato paste
First you heat up the onions, garlic, and carrots in cooking spray on low heat for about 5 minutes. I did it for much longer (and waited to put the garlic in) because I wanted to make sure the onions were not too raw. Then add in the cabbage, oregano, basil, salt, tomato paste and broth. Bring to boil and then cover and simmer for about 15 minutes. Then, throw in the zucchini and heat for another 3-4 minutes.
Not too bad! I ended up tripling-ish the recipe, but used more or less of certain ingredients. Anyway, I'll keep you all updated with short recaps of each day (mostly to remind myself how it was, should I ever attempt this again!).
Showing posts with label vegetables. Show all posts
Showing posts with label vegetables. Show all posts
Tuesday, August 18, 2009

Sunday, February 22, 2009
Recipes #6, #7: Chicken Parmesan & Zucchini with Parmesan
Earlier today, I decided that I wanted to make dinner, since I rarely have time during the week. Ryan's mom bought me two cookbooks for Christmas: Giada's Kitchen: New Italian Favorites and Barefoot Contessa Family Style. Those of you reading this probably know about my obsession with Giada (and Lisa's obsession with Barefoot Contessa, haha). Well, I decided to try something semi-new, and go with Ina Garten for tonight's dinner.
The zucchini with parmesan was taken directly from the Barefoot Contessa cookbook. Here's what you need:

The zucchini with parmesan was taken directly from the Barefoot Contessa cookbook. Here's what you need:
8 medium zucchini
Good olive oil
2 large yellow onions
Salt and pepper
1/2 cup freshly grated Parmesan cheese
First, cut the onions and zucchini. For the zucchini, cut them lengthwise, and then cut smaller pieces, like this:
Next, heat up 2 tablespoons of olive oil in a large pan and add the onions. I'm going to confess....I cut up the first onion and saw how much there was, and decided to only use one. I'm slowly learning to like (cooked) onions, so I didn't want to overdo it. And after I was all done, I was quite glad I didn't add that second onion. Anyway, you want to cook these for at least 10 minutes on medium-low heat, until they start to brown. Another confession: I cooked them for about 20 minutes. I wanted to make sure they were completely cooked. But if you aren't like me and don't need your onions to be 100% tender, then 10 minutes should be just fine!
After the 10 (or 20) minutes are up, add half of the zucchini, 1 tsp of salt and 1/4 tsp of pepper. Toss occasionally for 10-15 minutes. I ended up adding all of the zucchini, since I didn't want to deal with the two batches. The reasoning behind two separate batches is because they end up more "steamed" then "sauteed"....oh well, whatevs!

After the veggies have been cooking for the 10-15 minutes, add in the parmesan cheese and cook for an additional 30 seconds. Now, ideally, I think the cheese is kind of supposed to brown the veggies, but this didn't exactly happen. Oops. Maybe because I added too much olive oil (I'm convinced I did, because I didn't use two onions....the whole time it just kind of seemed like there was too much) or maybe because I ignored the recommendation to cook the zucchini in two separate batches. Oh well! The parmesan cheese (oh, and of course I added more than 1/2 cup, since I'm cheese-obsessed) ended up melting, instead of browning anything. But it was okay because they tasted yummy! Here's the end result:

So now onto the main dish! I've made this chicken parmesan a few times before. It's a recipe that oringated from Ina Garten, but Ryan's mom taught me how to finish the dish a little differently, which is the way I did it tonight. Here's what you're going to need:
6 skinless boneless chicken breasts (I always just buy the 4 pack from Foster Farms)
1 cup all-purpose flour
1 teaspoon kosher salt
1/2 teaspoon pepper
2 eggs
1 1/4 cups seasoned dry bread crumbs
1/2 freshly grated parmesan cheese (ok...I just use the kraft stuff for this)
unsalted butter
good olive oil
mozzarella cheese
Prego traditional tomato sauce
You start out the same as my last recipe, where you take the chicken breasts and cut off the fat and pound them until they are about 1/4 inch thick.

I swear that's the toughest part of this recipe. Next, you take out two plates and a bowl. On the first plate, mix the flour, salt and pepper. In the bowl, beat the eggs with a tablespoon of water. On the second plate, mix the breadcrumbs and parmesan cheese. Then, you take each chicken breast, coat it in the flour, dunk it in the egg mixture (make sure it gets everywhere) and then cover it all over with the bread crumb-cheese mixture.
 After coating the chicken breasts.

For this part, don't worry too much if the chicken breasts are kind of on top of each other. It's not as important for them to have their own space since they are already fully cooked. Unfortunately I don't have any more pictures to show, but the next step is to add the grated mozzarella cheese on top of each breast, and leave them in the pan (covered) until the cheese melts. And then it's ready to serve! Enjoy =)

After the veggies have been cooking for the 10-15 minutes, add in the parmesan cheese and cook for an additional 30 seconds. Now, ideally, I think the cheese is kind of supposed to brown the veggies, but this didn't exactly happen. Oops. Maybe because I added too much olive oil (I'm convinced I did, because I didn't use two onions....the whole time it just kind of seemed like there was too much) or maybe because I ignored the recommendation to cook the zucchini in two separate batches. Oh well! The parmesan cheese (oh, and of course I added more than 1/2 cup, since I'm cheese-obsessed) ended up melting, instead of browning anything. But it was okay because they tasted yummy! Here's the end result:

So now onto the main dish! I've made this chicken parmesan a few times before. It's a recipe that oringated from Ina Garten, but Ryan's mom taught me how to finish the dish a little differently, which is the way I did it tonight. Here's what you're going to need:
6 skinless boneless chicken breasts (I always just buy the 4 pack from Foster Farms)
1 cup all-purpose flour
1 teaspoon kosher salt
1/2 teaspoon pepper
2 eggs
1 1/4 cups seasoned dry bread crumbs
1/2 freshly grated parmesan cheese (ok...I just use the kraft stuff for this)
unsalted butter
good olive oil
mozzarella cheese
Prego traditional tomato sauce
You start out the same as my last recipe, where you take the chicken breasts and cut off the fat and pound them until they are about 1/4 inch thick.

In case you're curious, here's the tool I use for pounding.
 After coating the chicken breasts.
After that's done, heat up 1 tablespoon of butter and 1 tablespoon of olive oil into a large pan. Cook each chicken breat for a few minutes on medium-low heat. I probably let them cook for about 4 minutes on each side, but of course it depends how thick they are.
 When I first put them into the pan.

 When I first put them into the pan.
After flipping them over. Yum, nice and brown!
I cut the chicken breasts in half, so I ended up with 8 altogether. Therefore, I did them in two batches when I first cooked them. Once all of them are cooked and transferred to a plate, pour some of the Prego sauce into the same pan. But be careful! It may spray up at you...
Anyway, when I normally make this, there is always pasta. But for some reason, I chose not to make pasta tonight. So usually the extra sauce left over in the pan is mixed in with the pasta. You can just pour as much sauce into the pan as you think you need to coat the chicken and mix in with the pasta. I let the sauce heat up for a few minutes, and then placed the 8 chicken breasts into the sauce.
Anyway, when I normally make this, there is always pasta. But for some reason, I chose not to make pasta tonight. So usually the extra sauce left over in the pan is mixed in with the pasta. You can just pour as much sauce into the pan as you think you need to coat the chicken and mix in with the pasta. I let the sauce heat up for a few minutes, and then placed the 8 chicken breasts into the sauce.

For this part, don't worry too much if the chicken breasts are kind of on top of each other. It's not as important for them to have their own space since they are already fully cooked. Unfortunately I don't have any more pictures to show, but the next step is to add the grated mozzarella cheese on top of each breast, and leave them in the pan (covered) until the cheese melts. And then it's ready to serve! Enjoy =)
Wednesday, February 11, 2009
Recipes #4, #5: Blue Cheese Brussels Sprouts & Chicken Piccata
So the other night, Carlee and I decided to make dinner for my mom and sister. My mom LOVES brussels sprouts, as well as blue cheese (and so do I). I was super excited to learn how to make these wonderful vegetables! I have another brussels sprout recipe, which I'm sure I will be sharing soon enough....
Before I go into the brussels sprouts, I'll start with the chicken piccata. The recipe is from, surprise surprise, Giada de Laurentiis. It's very simple to make! I bought the Foster Farms skinless, boneless chicken breasts (comes with 4 in a pack), and de-fatted them. I'm not sure what the technical word for that is....but essentially, I told the knife, and cut off any white areas or red bloody areas. Luckily, these breasts didn't have much. Then, I pounded them out, and cut them all in half. I took a picture of the ready-to-be-coated cutlets, but it looked too gross, so I've decided to keep it to myself!
Next, put salt and pepper on them, and lightly coat them with flour. In a pan, put 2 Tbsp butter and 2 Tbsp olive oil. Once it starts to get hot, place the chicken in the pan, and cook for about 3 or 4 minutes on each side. The thinner you pound them, the quicker they cook!
Once they're done, put them on a plate, but don't dump out the extra butter and oil. In the pan, put about 1/3-1/2 cup of lemon juice (for me it was the juice from 2 lemons), 1/2-3/4 cup chicken broth, and 1/4 cup of capers (but I put in the entire jar). Let that come to a boil, and throw the chicken back in, and let it simmer for about 5 minutes. YUM.

4-5 shallots
2 cloves of garlic
red pepper flakes
1 Tbsp olive oil
brussels sprouts (we used maybe 1 pound?)
salt and pepper to taste
blue cheese
*recipe is stolen from Carlee...thanks!
Start off by cutting the brussels sprouts in half, and place them in a pot of boiling water for a few minutes. Once they've had a chance to cook, drain them, and put them in an "ice bath" or you can just place them in the freezer (to stop them from cooking anymore!). In the meantime, heat up 1 Tbsp of olive oil, and place the sliced shallots in the pan. We cooked these for a long time...until they were nice 'n brown!! Oh, and don't forget to add in the red pepper flakes! yummm
 Look at those yummy sprouts!
 The shallots stayed in the pan for probably 15-20 minutes.
They got super tender and were sooo good!
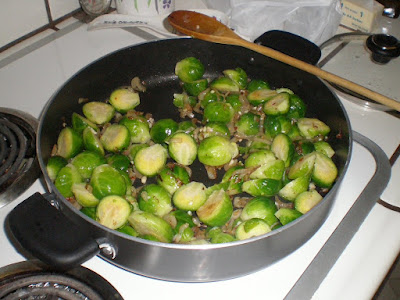
After the shallots have been browned to perfection, toss in the brussels sprouts and the garlic. We cooked these for another 15 minutes, at least. Make sure the brussels sprouts get tender, but not too mushy! They should have a nice golden brown color to them when they are finished.
Before I go into the brussels sprouts, I'll start with the chicken piccata. The recipe is from, surprise surprise, Giada de Laurentiis. It's very simple to make! I bought the Foster Farms skinless, boneless chicken breasts (comes with 4 in a pack), and de-fatted them. I'm not sure what the technical word for that is....but essentially, I told the knife, and cut off any white areas or red bloody areas. Luckily, these breasts didn't have much. Then, I pounded them out, and cut them all in half. I took a picture of the ready-to-be-coated cutlets, but it looked too gross, so I've decided to keep it to myself!
Next, put salt and pepper on them, and lightly coat them with flour. In a pan, put 2 Tbsp butter and 2 Tbsp olive oil. Once it starts to get hot, place the chicken in the pan, and cook for about 3 or 4 minutes on each side. The thinner you pound them, the quicker they cook!
Once they're done, put them on a plate, but don't dump out the extra butter and oil. In the pan, put about 1/3-1/2 cup of lemon juice (for me it was the juice from 2 lemons), 1/2-3/4 cup chicken broth, and 1/4 cup of capers (but I put in the entire jar). Let that come to a boil, and throw the chicken back in, and let it simmer for about 5 minutes. YUM.

There they are, ready to be served! If you make pasta, the extra sauce can be used for that =)
For the Blue Cheese Brussels Sprouts*, all you need is:4-5 shallots
2 cloves of garlic
red pepper flakes
1 Tbsp olive oil
brussels sprouts (we used maybe 1 pound?)
salt and pepper to taste
blue cheese
*recipe is stolen from Carlee...thanks!
Start off by cutting the brussels sprouts in half, and place them in a pot of boiling water for a few minutes. Once they've had a chance to cook, drain them, and put them in an "ice bath" or you can just place them in the freezer (to stop them from cooking anymore!). In the meantime, heat up 1 Tbsp of olive oil, and place the sliced shallots in the pan. We cooked these for a long time...until they were nice 'n brown!! Oh, and don't forget to add in the red pepper flakes! yummm
 Look at those yummy sprouts!
 The shallots stayed in the pan for probably 15-20 minutes.
They got super tender and were sooo good!
After the shallots have been browned to perfection, toss in the brussels sprouts and the garlic. We cooked these for another 15 minutes, at least. Make sure the brussels sprouts get tender, but not too mushy! They should have a nice golden brown color to them when they are finished.

Here's a picture before they were completely done, but you get the idea!
Unfortunately I failed to get a picture of the final product. I think I was just too excited to dig in! The brussels sprouts were amazing, and I will definitely be making these again. Oh, so at the very end, we ended up serving ourselves a portion of the sprouts, and then added as much blue cheese as we wanted. It melted and was wonderful with the brussels sprouts!
Subscribe to:
Posts (Atom)
